2.29 Automating an installation
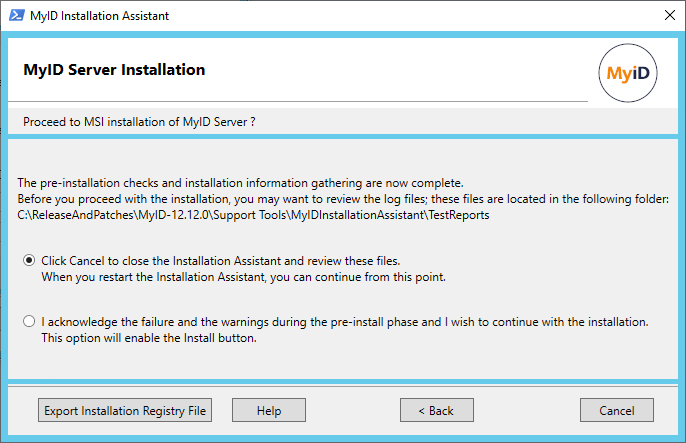
Once you have reached the MyID Server Installation screen, you can decide to proceed with the installation, or close the MyID Installation Assistant to return to it at a later time and complete the installation; alternatively, you can export all the settings you have entered up to this point as a registry file, and use this file to automate the MyID Installation Assistant process either on the current machine, or on another machine that has the same environment and configuration.
The process is as follows:
-
Export the registry file.
-
Update the registry file with the credentials.
The registry file does not contain any of the usernames or passwords you have provided when going through the MyID Installation Assistant process.
You must populate the file with the appropriate credentials before you can use it to automate an installation. You can:
-
Provide the credentials interactively.
See section 2.29.2, Populating the credentials in the registry file.
-
Create a configuration file to store the credentials.
See section 2.29.3, Automating the population of credentials in the registry file.
-
-
Enable the automation flag and run the MyID Installation Assistant.
2.29.1 Exporting the registry file
To export the registry file:
-
On the MyID Server Installation screen, click Export Installation Registry File.
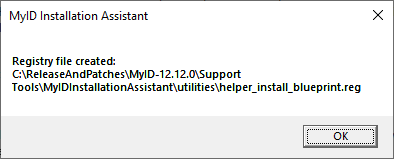
The MyID Installation Assistant exports the installation configuration to the helper_install_blueprint.reg file in the following folder:
<install folder>\Support Tools\MyIDInstallationAssistant\utilities\
-
Click OK.
-
Click Cancel to close the MyID Installation Assistant.

2.29.2 Populating the credentials in the registry file
For security reasons, the exported helper_install_blueprint.reg file strips out the usernames and passwords for the MyID service accounts (the MyID COM+ user, the MyID IIS user, the MyID Web Services user, and the MyID Authentication user), the database accounts, the HSM credentials, and the password for the MyID startup account.
To allow you to use these credentials when running the MyID Installation Assistant in automation mode, you can use the provided SetupUsers.ps1 PowerShell script to insert these passwords into the registry file. This script uses DPAPI to encrypt the passwords; this means you must run the script on the machine on which you want to import the registry file, under the user account you will use to run the MyID Installation Assistant.
To store the account passwords:
-
Log on using the Windows user account you will use to run the MyID Installation Assistant, on the server on which you will run the MyID Installation Assistant.
-
Open a Windows PowerShell command prompt.
-
Navigate to the following folder:
<install folder>\Support Tools\MyIDInstallationAssistant\utilities\
-
Make sure that there is no file called SetupUsers.json in the utilities folder.
This file is used for automating the SetupUsers.ps1 script; see section 2.29.3, Automating the population of credentials in the registry file. If this file exists, the script does not prompt for passwords, but instead loads the defaults from the file.
-
Run the following script:
.\SetupUsers.ps1
-
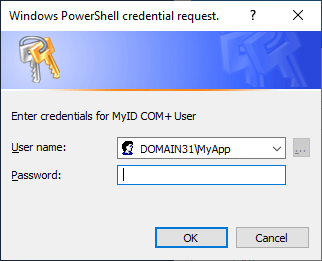
Follow the on-screen prompts to provide the user credentials.
The script prompts for each set of credentials:

If the script does not prompt for passwords, check to make sure you do not have file called SetupUsers.json in the utilities folder; if you do, remove it, and run the script again.
When the script is complete, it writes an updated registry file called helper_install.reg to the following folder:
<install folder>\Support Tools\MyIDInstallationAssistant\
2.29.3 Automating the population of credentials in the registry file
In some test environments, you may want to automate running the SetupUsers.ps1 script so that no user interaction is required to populate the registry file with passwords. To do this, you can provide the passwords in plain text in a file called SetupUsers.json in the utilities folder.
Note: This file is short-lived. When you run the SetupUsers.ps1 script, it extracts the passwords from this file, encrypts them, stores them in the helper_install.reg file, then (by default) deletes the SetupUsers.json file.
To automate the SetupUsers.ps1 script:
-
Open the SetupUsers.json template file in the following folder:
<install folder>\Support Tools\MyIDInstallationAssistant\utilities\
-
Edit the following:
Copy[
{
"COMUser": "Domain\\ComUser",
"COMCred": "COMUserCredential",
"IISUser": "Domain\\IISUser",
"IISCred": "IISUserCredential",
"WSUser": "Domain\\WebServiceUser",
"WSCred": "WebServiceUserCredential",
"AuthWSUser": "Domain\\AuthenticationWebServiceUser",
"AuthWSCred": "AuthenticationWebServiceUserCredential",
"DBUser": "MyIDDBUser",
"DBCred": "MyIDDBCred",
"DBArchUser": "MyIDArchDBUser",
"DBArchCred": "MyIDArchDBCred",
"AuthDBUser": "MyIDAuthDBUser",
"AuthDBCred": "MyIDAuthDBCred",
"HSMPartitionPasswordCred": "HSMPartitionPasswordCred",
"HSMPINCred": "HSMPINCred",
"StartupPasswordCred": "StartupPasswordCred"
}
]where:
-
COMUser – the domain and user for the MyID COM+ user account.
-
COMCred – the password for the MyID COM+ user account in plain text.
-
IISUser – the domain and user for the MyID IIS user account.
-
IISCred – the password for the MyID IIS user account in plain text.
-
WSUser – the domain and user for the MyID web service user account.
-
WSCred – the password for the MyID web service account in plain text.
-
AuthWSUser – the domain and user for the MyID auth user account.
-
AuthWSCred – the password for the MyID auth account in plain text.
-
DBUser – if you are using SQL authentication, the database user name.
-
DBCred – the database user password in plain text.
-
DBArchUser – if you are using SQL authentication, the archive database user name.
-
DBArchCred – the archive database password in plain text.
-
AuthDBUser – if you are using SQL authentication, the authentication database user name.
-
AuthDBCred – the authentication database password in plain text.
-
HSMPartitionPasswordCred – if you are using a Thales LUNA HSM, the HSM partition password in plain text.
-
HSMPINCred – if you are installing an additional application server that uses an HSM, the HSM PIN in plain text.
-
StartupPasswordCred – the password for the startup user, in plain text.
Note: Use double slashes for the slashes in the domain\user for each username; for example, for the MYDOMAIN\MyUserName account, use:
MYDOMAIN\\MyUserName
You do not need to include any items that you are not using for the current installation; for example, if you are using Windows authentication for database access, you do not need to provide database usernames and passwords, or if you are installing the application server and database server, you do not need to provide the IIS user account or web service account details.
For example:
Copy[
{
"COMUser": "Domain\\ComUser",
"COMCred": "MyIDCOMUserPassword123",
"IISUser": "Domain\\IISUser",
"IISCred": "MyIDIISUserPassword123",
"WSUser": "Domain\\WebServiceUser",
"WSCred": "MyIDWSUserPassword123",
"AuthWSUser": "Domain\\AuthenticationWebServiceUser",
"AuthWSCred": "MyIDAuthUserPassword123",
"StartupPasswordCred": "StartupPassword123"
}
] -
-
Save the file.
You can now run the SetupUsers.ps1 PowerShell script to insert these credentials into the registry file.
Important: By default, the SetupUsers.ps1 script deletes the SetupUsers.json file on completion. If you want to retain the file, you can run the script with the following parameter:
.\SetupUsers.ps1 -KeepJsonFile $True
Note, however, that the SetupUsers.json file is always deleted when you run the MyID Installation Assistant. If you want to retain the information in this file, make sure that you make a secure backup before you run the script; for security reasons, you are not recommended to leave this file with plaintext passwords freely available on the server for longer than is necessary.
2.29.4 Configuring the automation settings
The MyID Installation Assistant automation mode is controlled by a configuration file.
To enable the automation settings:
-
In a text editor, open the following file:
<install folder>\Support Tools\MyIDInstallationAssistant\defaults\Automation.js
-
Edit the following settings:
Copy[
{
"AUTOSEQ": "0",
"MANSEQ": "1",
"ApplyFixItScripts": "0",
"StopLevel": "None"
}
]Set the following:
-
AUTOSEQ – set this option to 1 to enable automation mode.
To disable automation mode, set this option to 0.
-
MANSEQ – set this option to 1 to perform the standard MyID Installation Assistant checks.
To disable checks, set this option to 0.
-
ApplyFixItScripts – set this option to 1 to apply the fix-it scripts automatically.
The MyID Installation Assistant runs the scripts up to three times to attempt to fix the issues. If there are still issues after three attempts, the MyID Installation Assistant checks the StopLevel configuration to determine its course of action.
To disable fix-it scripts, set this option to 0.
-
StopLevel – set this option to one of the following:
-
"None" – the automation stops only if a fatal issue occurs.
-
"Error" – the automation stops if an fatal issue or an error occurs.
-
"Warning" – the automation stops if a fatal issue, an error, or a warning occurs.
-
For example:
Copy[
{
"AUTOSEQ": "1",
"MANSEQ": "1",
"ApplyFixItScripts": "1",
"StopLevel": "None"
}
]This example enables automation mode, runs all checks, applies all relevant fix-it scripts, and stops only if it encounters a fatal error.
-
-
Save the configuration file.
When you run the MyID Installation Assistant in automation mode, it loads the contents of the helper_install.reg file into the registry, including the encrypted passwords you added to the file, then starts at the first screen, and automatically moves through each screen without user interaction, until it completes the installation of MyID.
If an error occurs and the MyID Installation Assistant stops, the screen on which the error occurred remains open. You can also view the results of the SIU tests in the TestReports folder.
If you experience issues, you are recommended to run the installation from the Windows PowerShell command prompt:
-
Open a Windows PowerShell command prompt with elevated permissions.
-
Navigate to the following folder:
<install folder>\Support Tools\MyIDInstallationAssistant\
-
Run the following script:
.\MyIDInstallationAssistant.ps1
This provides you with some additional debug information in the console.
2.29.5 Checking the imported passwords
Once the MyID Installation Assistant has started in automation mode and loaded the contents of the helper_install.reg file into the registry, you can confirm that you have entered the service account passwords correctly by running the Decrypt.ps1 script.
To check the values of service account passwords in the registry:
-
Log on using the Windows user account you will use to run the MyID Installation Assistant, on the server on which you will run the MyID Installation Assistant.
-
Open a Windows PowerShell command prompt.
-
Navigate to the following folder:
<install folder>\Support Tools\MyIDInstallationAssistant\utilities\
-
Run the following script:
.\Decrypt.ps1
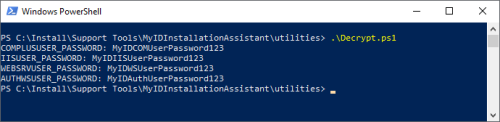
The user account passwords are obtained from the registry and decrypted using DPAPI with your logged-on user's credentials.
If the passwords do not match, or the script displays an error, make sure that you have logged on to the same machine with the same user account as was used to run the SetupUsers.ps1 script.
